


Genetica 4.0 — New Tools and Features Overview
At the end of December 2012 Spiral Graphics, Inc. announced a new version of its Genetica seamless texture and animation editor. Accordingly to the developer, Genetica 4.0 was reported to get a number of new features and tools, including adjusters — the new way to control node parameters, image filter system and PixelScript scripting language. After some months of further development and testing Genetica 4.0 was released at the end of May 2013.
This overview article will be focused exclusively on all-new features of Genetica 4.0, unavailable in previous versions of software. The topics covered will be adjusters, image filter and post-processing effects system, 3D models support, PixelScript scripting language and some other features that made Genetica even more powerful and easy to use. But, before get started with the overview, I'd like to make a small note regarding the previous version of Genetica.
In July, 2011, when Genetica 3.6 was released, I reviewed it in details in the following article:
If you are new to Genetica and want to learn about its overall functionality and features, I highly recommend to look through that review article as well. Clearly, there's a lot of powerful tools and features that has been there before Genetica 4.0, and many of them were really great. These tools and features were reviewed previously and will not be covered in this article.
I will start with the most visible part of Genetica 4.0 — its user interface. Color scheme was changed slightly from previous version — now it uses light blue and dark gray colors instead of yellow and light gray. Background in some areas become darker, and some modifications were made to the menu icons.
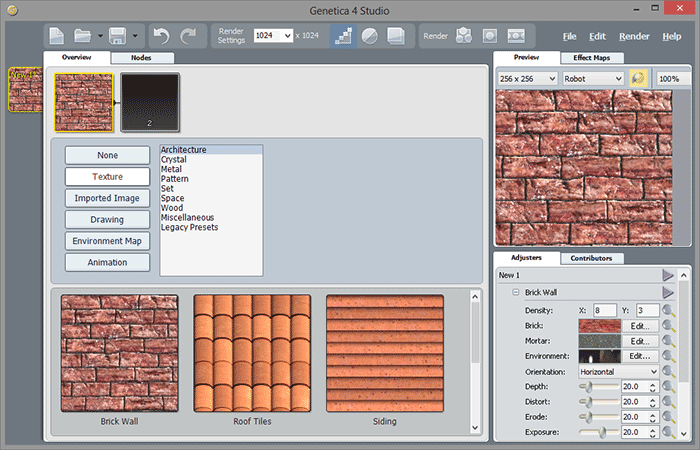 An updated user interface of Genetica 4.0
As for the structure of the UI — Genetica 4.0 uses slightly different blocks layout. File menu has been moved to the top right corner. The list of opened documents now displayed as a vertical tabs with slightly larger thumbnails in the left part of Genetica's window. Contributors block and new Adjusters block now can be found at the bottom right corner. Node Tree block has been replaced with "breadcrumbs"-like navigation that can be found at the bottom of Nodes tab area.
New Preview block in the top right corner immediately catches the eye with a large refreshing view of current document. This block will be re-rendered every time user makes changes to the parameters that affect image output. A number of settings are available for this block, including preview image resolution, color-only render switch, zoom level and image tiling control switch.
Actually this feature isn't all-new, because it was available in previous versions of Genetica in form of the Floating View window. In Genetica 4.0 one copy of such view has been integrated into the main UI as a Preview block and become much more accessible. Of course, users still will be able to create additional Floating View windows and place them, for example, to an additional monitor.
Be aware that if document structure is complex, refreshing of a Preview block can be slow — it may be wise to use low resolution images for the preview and get back to a larger resolutions when it's important to see all of the details.
Main work area has been modified slightly. Start tab was replaced with Overview tab, which is divided into several zones. Looking from the top to bottom first you'll see is a row of numbered blocks, where each block represents one stage in Genetica's pipeline. Usually the first block is a "source", which can be an imported image, texture preset from the library, drawing, environment map or animation preset, while the second and subsequent is a "filter", where you can use a filter or post-processing effect. You can apply more than one filter to the image — in that case, there will be more than two numbered blocks.
Left mouse button click on the numbered block will reveal corresponding options below, in the second zone. This is a place where you can select what type of "source" you would like to use, or what type of "filter" you would like to apply. For "source" and "filter" blocks, depending on the option selected, you can choose from a library of pre-made textures and presets, shown in the third zone. In general, the Overview tab can be seen as a starting point for the work, with further "fine-tuning" available through individual node parameters or the Adjusters (which will be covered below).
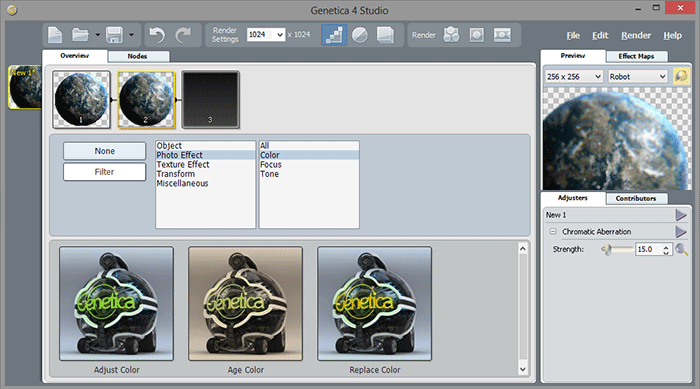 Filter / Image Effect selection screen
The Nodes tab has not been modified except the mentioned above "breadcrumbs", so there is not much to cover. The Nodes tab is the main work area of Genetica and it is where you can perform operations with nodes: create new nodes, edit their parameters, replace nodes, modify connections, etc.
In this context, I'd like to make a small reminder that Genetica uses a "node-based" approach in its design. This is a very powerful architecture that can be found in many hi-end computer graphics and game development software, including Autodesk Maya, The Foundry Nuke, Side Effects Software Houdini and some others. Functionality of the software with node architecture is based on usage of highly specialized nodes associated with each other with different types of in/out connections. Each of those nodes can be considered as a "black box" where the "box" processes its input data in some way and sends the results further down the node graph.
Let us conclude — as it seems to me, Genetica developers did a good job on making the UI better in overall, more usable and structured. That concludes the UI changes overview. The next topic will be all-new Adjusters.
The most important new feature in terms of usability is the Adjusters. You can find them in a block of the same name at the bottom right corner of Genetica's window. Adjusters will let you quickly change and edit current document parameters right from the main window, without the need to navigate through node tree in search for those parameters. Usually the Adjusters available in pre-made textures contain a number of most important node parameters that will affect its common properties, such as material, color or shape.
The most basic Adjusters are available in form of sliders allowing modifying of parameters by dragging the slider to the left or to the right. For other parameter types it can be a drop-down list, Yes/No switch, different editors (like Color Editor for making a color choice), and some others.
The easiest way to see the Adjusters in work is to open a texture from Genetica's texture library. New presets that has been added to Genetica 4.0 have built-in Adjusters available for use. Unfortunately, the old presets that has been transferred from Genetica 3.6 and can be found under Legacy Presets category, have no Adjusters (still they can be created manually for such textures, this is explained below).
To illustrate the Adjusters I will load a Brick Wall texture preset, as this one was extensively used in promo materials for Genetica 4.0. As you can see from the screenshot below, by default there is over a dozen of adjusters for this texture controlling different parameters.
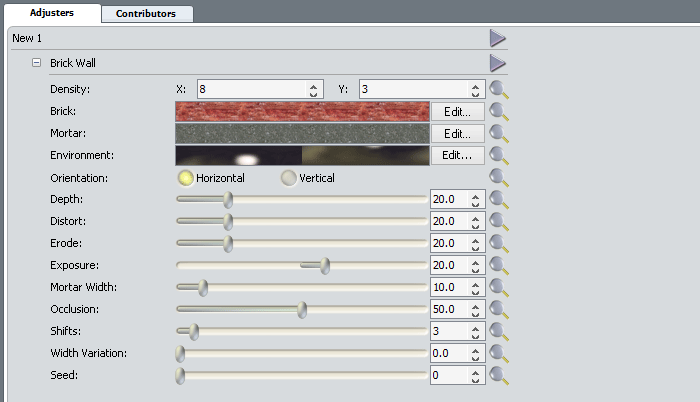 The Adjusters block and adjusters themselves
The Density adjuster allows to set a number of bricks in the row and along a vertical axis, a group of adjusters below — to set a base images used for texture synthesis, with the following sliders controlling bricks shape uniformity, mortar width, vertical seams location, brick width variations, etc.
Without the Adjusters, most of this parameters would been scattered across different nodes in a large node tree, and their editing could not been made so fast and simple. User would have to locate individual nodes, edit their parameters and then proceed to the next one. Now Genetica offers a convenient and powerful system that allows keeping all of the important parameters under control in one place, available for easy access and straightforward editing.
No less important is that users are not limited to the adjusters created by Spiral Graphics — adjusters can be freely added to existing textures and filter presets. An adjuster can be connected to almost any node parameter, and different adjusters can be placed in logical groups to keep them organized. This allows users to create easy-to-use and flexible control systems for their documents using adjusters. No more "node digging" for often edited parameters made possible.
To create an adjuster, in the Nodes tab select a node with a parameter that you'd like to control with it, and click on the red/gray button "Connect property to an adjuster" on the right side (see image below). A dialog window will pop-up, where you can specify adjuster's name, or connect this parameter to the existing adjuster. A button colored in green means that this parameter already has an adjuster associated with it.
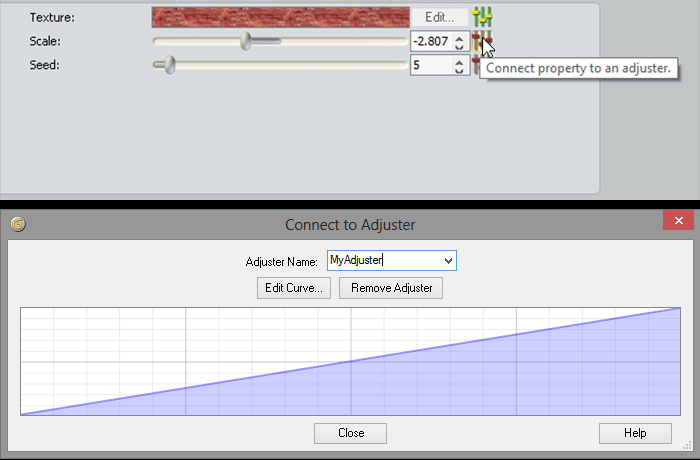 Connect property to an adjuster screen
In the same dialog window you will find the Edit Curve button. It will bring up the Curve Editor that allows setting up a parameter mapping to an adjuster using curves, where X-axis is an adjuster value, and Y-axis is a parameter value. Curve Editor can be used for limiting minimum and maximum values of parameter edited by the adjuster, change mapping from linear (default) to sine, exponential, "saw tooth"-like, etc.
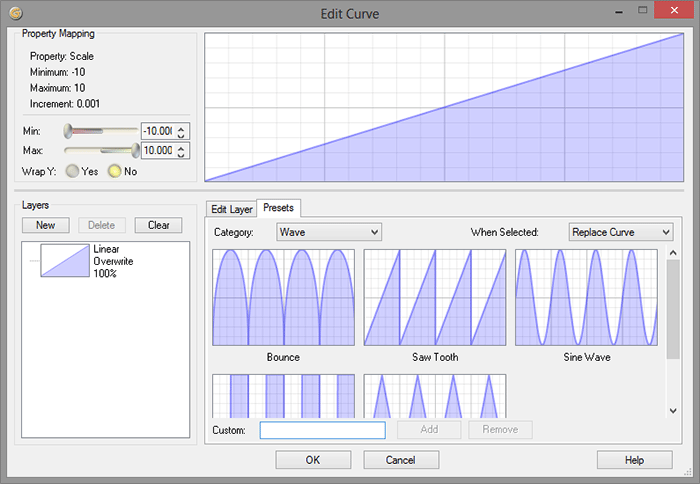 Adjuster curve editor
After the parameter has been connected to an Adjuster, it will appear in the Adjusters block and become available for editing and managing. To make a change to the adjuster, you have to click a magnifying glass icon (Edit adjuster button). Some additional settings for the adjuster are available in this editor, such as its name, order in the adjusters list, accuracy, type and others.
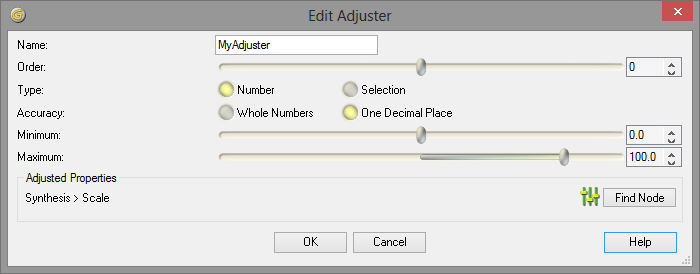 Adjuster editor in Genetica 4.0
Well, that is pretty much about the Adjusters. Indeed, a very convenient system that allows parameters to be controlled from Genetica's main window.
Genetica 4.0 has new filter system that allows application of different types of image filters. Users can select filters from a library of filter presets or create their own filters.
To apply a filter you should go to the Overview tab, select an empty pipeline block numbered with 2 (or 3, 4, 5...), press the Filter button below and select desired filter from the library of filter presets. The library is broken down into several categories, such as object filters, photo effects, texture effects and some others.
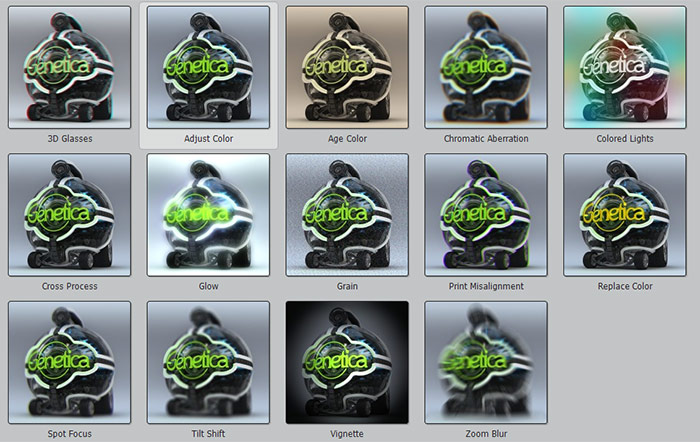 Part of filter presets library in Genetica 4.0
Some basic filters were available before in form of individual nodes (like Free Transform, which is a single node filter), but most of them are completely new. In fact, filters are just a group of nodes forming a node network with a specific result.
This is easily can be seen after you've applied a filter to the texture by checking the Nodes tab. What you'll see there is a new group of nodes sharing the filter's name. Expanding the group will reveal its node network. For example, Glow filter consists of only seven nodes, with main functionality shared among just the following three: Equalize, Gaussian Blur and Exposure. Some other filters is much more complex and can consist of more than 50 nodes. What you can see below is a part of an expanded group of Chromatic Aberration filter (consists of 26 nodes).
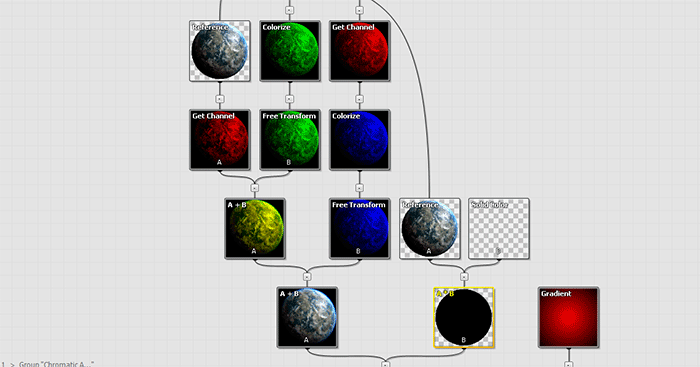 Node tree of Chromatic Aberration filter
As you can see, Filters is nothing but pure nodes. With some skill and knowledge of Genetica and basic principles behind the effect you want to achieve, constructing new filters and effects shouldn't be a trouble. I personally wouldn't call this task as "too easy", but even the library of filter presets already available in Genetica 4.0 is indeed a great addition to its toolset. I'm pretty sure that Filters will be very useful in different scenarios.
Another exciting new feature in Genetica 4.0 is support for the 3D models inside the editor. Now Genetica can import 3D models in 3DS and OBJ file formats and use them in texture synthesis and for other processing. In addition, there is a feature that allows to create basic geometric primitives right inside the editor, including a cube, cone, sphere and some others. Main requirement for the imported 3D models to be available for correct processing in Genetica — they should contain UV-coordinates and be properly UV-mapped.
Imported 3D models can be used in a number of ways. It is possible to apply Genetica seamless texture to the model and immediately see the results. This can be useful for checking how texture will actually look on the model, and tweak it if something is not quite right. Saving in time for such task is enormous in comparison with Genetica 3.6, where users were forced to export their textures, load them into 3D software (such as Maya or 3ds Max) and evaluate the models. Now it is not necessary to do something like this — you can do the most inside the Genetica.
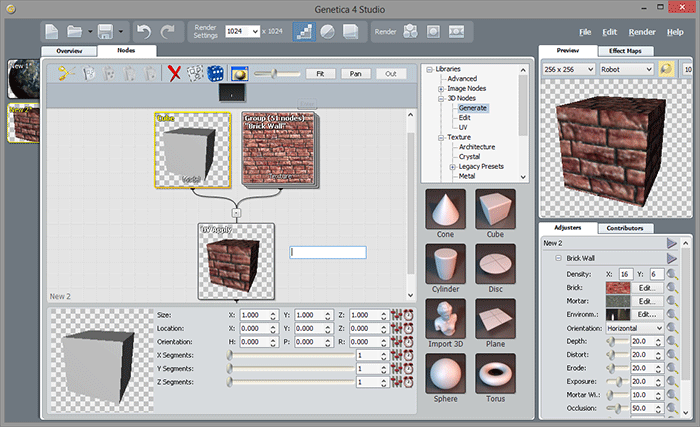 3D model import and texture application
Note that new nodes related to 3D models have two output modes: UV Map and Textured Model. If output mode is set to UV Map, the result of data processing inside those nodes will be presented in form of flat UV texture. If you want to see a 3D model itself — usually you will need to adjust that setting and set it to Textured Model.
There is some more interesting features for 3D models processing inside Genetica 4.0. You can generate Ambient Occlusion maps; bake Environment Light into textures; project textures onto a model surface, etc. Basic transformations available for use (translation, scaling, rotation), mesh combining, light clearing and more. In short, Genetica 4.0 allows performing basics operations with the 3D models without leaving its work area.
Owners of Genetica 4.0 Studio Edition who are already familiar with special terms such as "real", "integer" or "if-else" can benefit from introduction of new scripting language called PixelScript. This scripting tool greatly expands Genetica's capabilities in terms of custom operations and programmatically generated effects. Note that PixelScript is a proprietary language found only in Genetica and has no connections with other languages that may share the same name.
PixelScript certainly is a tool for advanced users. Using custom-written scripts tech-savvy artists and programmers can manipulate images in exotic manners, creating effects otherwise unobtainable. In some extent, PixelScript for Genetica is something similar to pixel shaders for modern video cards, where you're manipulating image data with program code.
This powerful tool is accessed through a special node that can be found in Advanced category of Genetica's node library (in the Nodes tab). PixelScript node contains six parameters that can be used through a script code, as well as the Script: Edit button that will bring up the PixelScript Editor. This editor is the main tool used for script development and divided into two halves, with the left half containing script preview block and debug window, and the right half containing code editor and Presets tab.
![]() PixelScript Editor in Genetica 4.0
PixelScript Editor in Genetica 4.0
Genetica 4.0 has ten PixelScript samples/presets available by default. Each of those samples contains examples of script code that demonstrates work of PixelScript and can be helpful resource to get started with it. An example of PixelScript presets is Mandelbrot Set, named after the known mathematician. This "object" is a typical fractal and it is generated with a math formula. So, with PixelScript in Genetica it is possible to create defined shapes and images with no nodes being used (actually just one node — PixelScript). Of course, that is if you know how to do that :).
![]() Script examples in PixelScript presets library
Script examples in PixelScript presets library
Not less exciting is the fact that PixelScript can be used in conjunction with the rest of Genetica's features, like node parameters animation. Altogether, it allows achieving some very interesting results...

Sometimes it is necessary to step away from procedural texture generation, nodes or scripts and use just simple drawing tools. Genetica 4.0 received a number of enhancements in this area, including several new drawing tools and new modes for already existing tools.
Draw Tool was updated and received Freehand drawing mode. It allows drawing continuous lines that will be converted to curves or shapes upon release of left mouse button. A new drawing tool is the Paint brush, which has much in common with a Freehand mode of Draw tool except some aspects. In addition, Paint Brush features a pressure-sensitive mode that allows to detect pressure level from devices supporting this feature (such as Wacom graphics tablets) and change the brush width accordingly. This mode activates automatically if supported device is attached to the PC when Genetica is launched.
The new Snippet tool is a feature that allows creating, store and re-use of vector image templates. With active Show button that can be found in the top toolbar, the left part of the screen will have the Snippets block displayed. This is where actual snippets are stored and from where they can be selected to be transferred to the canvas. Categories can be used to store snippets in different groups. Snippets can be exported or imported from third-party applications in SVG file format.
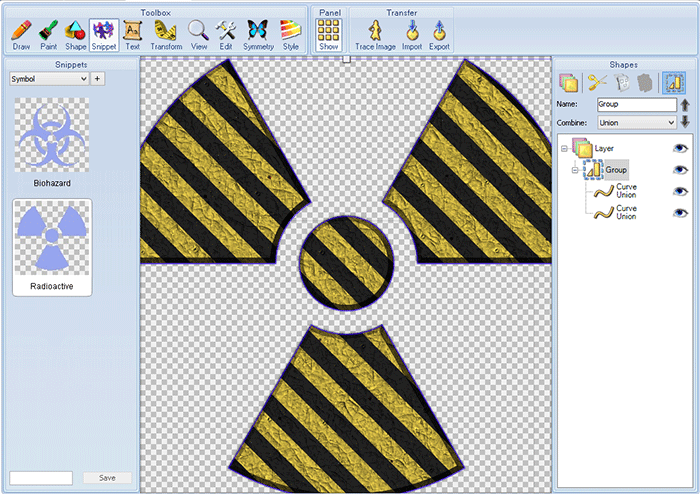 Snippets and snippets storage
The last new drawing tool over there is a Trace Image Tool, available through toolbar. This tool allows converting ('tracing') bitmap images into vector shapes using a number of different settings. The most common use of this feature is to "extract" some object from its background and use it as a source for a texture (something like logo, emblem, etc.).
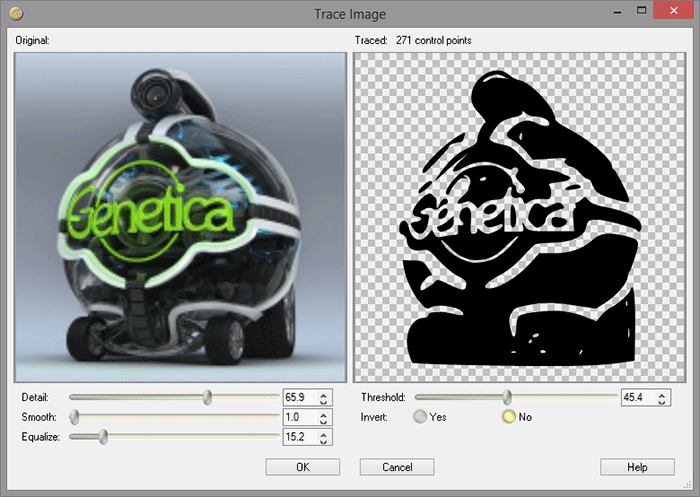 Trace Image tool in Genetica 4.0
The last topic in this Genetica 4.0 new features coverage will be new nodes. Obviously, with that much new features making their way into Genetica introduction of new nodes was inevitable. Most of those nodes with no surprise are tightly connected with new tools and features. The new nodes spotted are the following:
PixelScript node — allows creating and executing of scripts written in PixelScript language. A completely new group of Blur nodes — these nodes implement different types of image blurring (Motion Blur, Shape Blur, etc.). Levels node — allows controlling separate color channel levels or combined RGB levels. Functionality is similar to Adobe Photoshop's Levels.
A group of 3D nodes, apparently, is connected to the new 3D models import and texture processing functionality. These nodes are divided into three groups: Generate, Edit and UV. Nodes of Generate group can be used to create geometric primitives or for importing 3D objects in 3DS or OBJ file formats into Genetica, nodes of UV group — apply textures to the models or "synthesize" them into UV-space.
So, the overview of new features that were brought by new version of Genetica is finished. What conclusion can be drawn after all of the above?
First, it is safe to say that this release was successful. Introduction of the Adjusters made a good impact on overall Genetica's usability and comfort of use. The "old way" with direct node tweaking is still there, but now you can arrange your workspace for document tweaking inside the Genetica much more effectively. The ability to edit important parameters with a few clicks is essential for software such as Genetica, and it was really good to see that it finally got this features. As it was mentioned above, saving in time with the Adjusters (as well as with 3D models support) can be enormous, depending on usage scenario.
Second, the Filters system. Despite the fact that filters is just a group of nodes with a specific task, a great number of presets available in Genetica 4.0 is surely a nice addition to its toolset. Sometimes there is a situation when you need to perform a small correction to the final image, like make a color correction — without the filters it will be necessary to export it and import in some other image editing software to do it. Now in Genetica 4.0 you can just create a custom filter and apply it anytime you need it.
I do like to emphasize that every piece of software is just a tool for an artist, and the artists are often very creative with their tools. It is hard to guess in which way some particular tool will be used — some people even make pictures of nails. This is why I can only welcome any new addition to the Genetica's powerful toolset.
For example, let's take a closer look at the Explosion Ring preset from Space category.
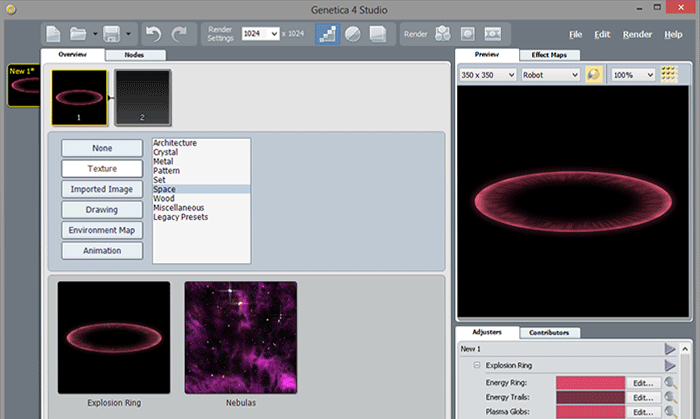 Explosion Ring texture preset before the modification with the adjusters
With the Sideways adjuster I will change its shape to make it a circle, and with adjusters Energy Ring, Energy Trails and Plasma Globs I will change its color. Then I will apply Adjust Color filter, which allows me to replace selected areas with other color. With correct settings, I was able to add some patches of pale yellow color to the image in its central area.
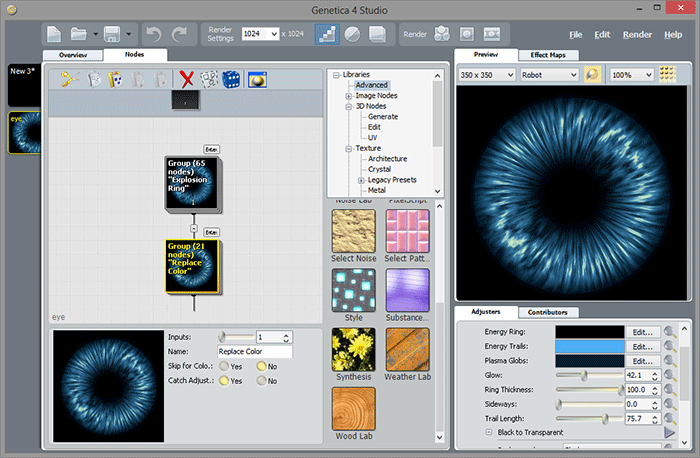 Example of quick modifications made to the texture by the adjusters
To me it looks much like an iris of the eye, and such result was very quickly achieved thanks to Adjust Color filter. After taking a minute in Photoshop to apply this iris to the random eye image taken from the internet, I was looking on this:
 Example of the image made with modified Explosion Ring texture
There is a really wide opportunities with Genetica, and after the release of Genetica 4.0 they become even wider — everything is in hands of the artists.
Third, the support for 3D models. This is a relatively simple — you can't do everything with 3D models inside Genetica, but the most basic and essential operations now can be done without bothering to export textures and load them into dedicated 3D software. My favorite feature is the ability to see generated textures right on the models, and I'm sure that other 3D features will not be left out.
Fourth, the PixelScript. I can't really comment on this with a deep knowledge of the subject, but I'm pretty sure that access to image editing with scripting code can be beneficial sometimes. Math savvy users will have a neat tool to play with.
Lastly, the drawing tools. If you need to draw something manually, create a logo or some pattern — you will have the tools for this. Introduction of pressure-sensitive brush isn't likely to be called a revolutionary addition, but developer's attention to such details is a commendable. Wacom tablets users will be pleased.
On the whole, it seems to me that Genetica 4.0 become more finished and well-rounded software — thanks to introduction of the new features that filled some gaps in different areas. Now Genetica is a more powerful, user-friendly and flexible than ever before. I highly recommend it for anyone, be it creative professionals or hobbyists with interest in computer graphics and game development industries.
This section will give a hint on how to get started with Genetica.
Visit Spiral Graphics' official website where you can download a trial version of Genetica. Genetica available in three editions (you can try all of them in the trial version) — Basic ($149), Pro ($399) and Studio ($899). Difference between available features for each edition of Genetica can be seen on features overview page.
Don't forget about the Help File, accessed through Help menu or called by F1 button on the keyboard. This is a very helpful resource that contains a full description of Genetica's tools and features, as well as a number of helpful tutorials to help understand Genetica.
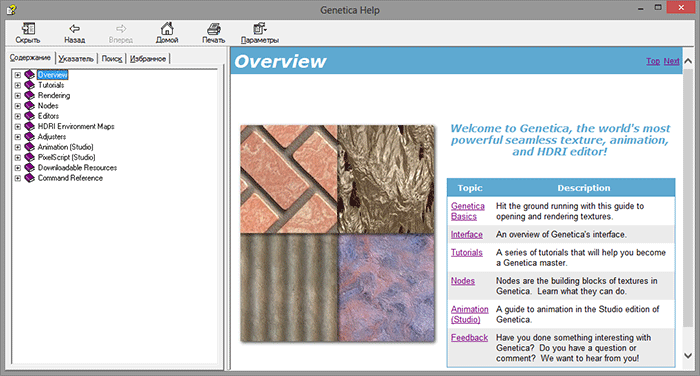 Help File of Genetica 4.0
In addition, there is a Tutorials section on Spiral Graphics' website with an expanded list of available tutorials (including video tutorials) — this is a good starting point if you're looking for some visual guidance.
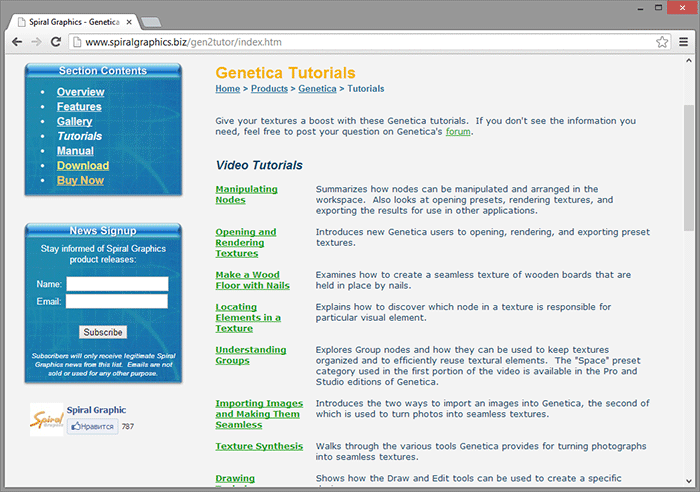 Genetica tutorials section on Spiral Graphics' website
Finally, the Spiral Graphics community forum contains the answers to many questions regarding the use of Genetica. This is a place where you can seek help from the community, if you don't know how to do something and want an advice. Community forums is a great place to talk about Genetica, share own experience and learn from others.
Don't forget about my previous article, in which I've reviewed Genetica 3.6 — that review has not lost its relevance and contains many fundamental Genetica's features:
This concludes the overview of Genetica 4.0 new features. I would like to thank Spiral Graphics Inc. Founder and CEO Atlas Roufas for the software copy provided for the review. Suggestions and comments are welcome! Thank you for reading.