
Wacom Tablets - How To Reduce Nib Wearing ( Intuos4 )
 For happy and proud owners of Wacom graphics tablets Intuos4 series, which become a standard in graphics design industry, it's not a secret that this tablets have "special ability" to flatten out pen nibs ridiculously quick — some people says that ten hours of intense work can "eat" one nib. This is pretty frustrating, because nibs not only pretty expensive ( $20 for five ), but sometimes it's may be difficult to get a replace in some countries. In this material I'd like to review one tricky way to reduce nib flattening and at the same time make Intuos pen work more comfortable for some users.
Wacom Intuos 4 driver hack
There is a known, but officially undocumented feature in Wacom tablet driver, which allows to change ratio of pen physical pressure level to transfered by the driver "virtual" pressure leve. In other words, we can change sensitivity curve of a pen. Driver settings that can be accessed through menu allows to do some sensitivity curve profile changing, but this settings affects only curve itself, and not their border levels.
All right, this is become way too complicated, let me explain it in more common words. In overall, we want to adjust some settings that are stored in driver configuration file, what will allow us to press on pen lighter to achieve 100% pressure level. Thus it will help to reduce nib wear — less pressure, less flattening. Moreover — some people think that Intuos4 pen at it's default settings have to be pressed way too hard to achieve "full" pressure effect — this trick will help those people also.
So, to implement this kind of stuff at Intuos4 example we need to do four steps with tablet driver:
- Make sure that pen settings at it's defaults.
- Go to %APPDATA%/WTablet ( C:\User\<user name>\AppData\Roaming\WTablet ) and open Wacom_Tablet.dat with any text editor ( for example, Notepad or Wordpad ).
- Find string:
tip in file contents, and two rows below that — another string:
81 0 1024 1024 2047 2047 This is our target. Pay attention at three pair of numbers — 81 and 0, 1024 and 1024, 2047 and 2047. Left number in pair — it's a "physical" pressure level that received by pen, and right number — it's a "virtual" pen pressure level that tablet driver will send to application for corresponding "physical" pressure level. This three pairs of numbers forms a initial sensitivity curve profile. Thus, this numbers can be read like this: for 81 units of physical pressure it's will be 0 units of virtual pressure level ( this is threshold against random press detections ), for 1024 units of physical pressure — 1024 of virtual pressure, and for 2047 physical units — same 2047 units of virtual, driver units ( Intuos4 pen have 2048 levels of pressure, so if count 0 level — it's will be 2047 ). This is default settings, and we gonna change this to suit our needs.
Our purpose is to make such corrections that less physical pressure will be interpreted by driver like more harder pressure, which will be transfered to applications. In other words, we will need to change initial sensitive curve profile. For this we must change left numbers in last two number pairs, mentioned above. In this example we will reduce physical levels by 25%, and for this we will need to cut quarter from 1024 and 2047. So, after this our string must look like this:
81 0 768 1024 1536 2047 4. Restart TabletServiceWacom service or just reboot your PC.
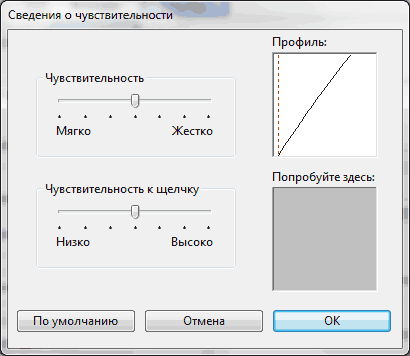
To ensure that changes actually took place you can check Wacom Tablet Driver Settings, Pen Sensitivity section. You should notice profile changes, which top point now "shifted" to the left and looks like this:
After this we can press a pen on tablet surface with 25% less strength to achieve desired results. Also this can not only be useful for reducing pen wear and flattening, but for artists that don't like to press too hard and prefer "light strokes" workflow.
Just as an addition — same way Eraser sensitivity curse also can be changed, just search in p.3 for
eraser You May Also Be Interested in:
About the Author: Sergey “Treidge” Danchenko
- 38572 reads
- Русский
Translate This Page
Follow Us
Featured Content
Recent Blog Posts
User Login Form
Poll
Subscribe by Email
Subscribe and get the latest blog posts right to your Email.
Excellent tip!
This will help to cut down on nib wear.
Thanks!
You're welcome By the way, I'd like to add to this post that Wacom already acknowledged this problem ( it's a miracle! ) and Intuos4 tablets for about a year now are produced with slightly changed cover sheet, which supposed to reduce nib wearing slightly. Or at least they told us so.
Wow, way cool and really good to know.
But does this mean that we lose 25% of the sensitivity?
Actually this article is obsolete — Wacom finally added this feature to the drivers, so you can achieve the same result using Wacom Pressure Curve Tool (can be found in driver's control panel). Just click and drag middle square and top triangle to set up a profile curve. To achieve the same results as in the original article above, drag the square slightly to the top, and top triangle to the left. If you don't want to reduce effective pen pressure levels available — drag only the square and leave the triangle intact.
This is not an obsolete post! Wacom did not include the Pressure Curve Tool on their Bamboo drivers for Mac :( this manual fix did the job for me! Thanks!